How to Draw A Snail
As an Amazon Associate, I earn from qualifying purchases. This post may contain affiliate links. See our full disclosure here.
You might want to take this easy drawing tutorial slowly because today we’re learning how to draw a snail! Thankfully this adorable snail drawing is actually super simple, which means you’ll be able to master it a lot faster than a snail’s pace.
Whether you’re an adult looking for cute things to draw or want an easy tutorial for kids, these simple step by step instructions will have your drawing snails like a pro in no time. Super cute for doodling too!
Snails are fun creatures that many kids are familiar with. They are also made up of a few simple shapes, which makes them a perfect way to gain some confidence in your drawing skills, while also having some fun along the way.
Enough talking about it. Let’s get to it!
Materials Needed to Draw a Snail
To put together this easy snail drawing, you will only need a few basic materials. You probably have most of these lying around your house already.
- Graphite pencil
- Drawing paper
- Eraser
- Pencil sharpener
- Black pen for outlining
- Coloring supplies of your choice
- Flat drawing surface
- How to draw a snail instructions
- Optional: Circle template or stencil
Once you have all of these materials gathered up, you can begin drawing your snail.
How to Draw a Snail: Step by Step Instructions
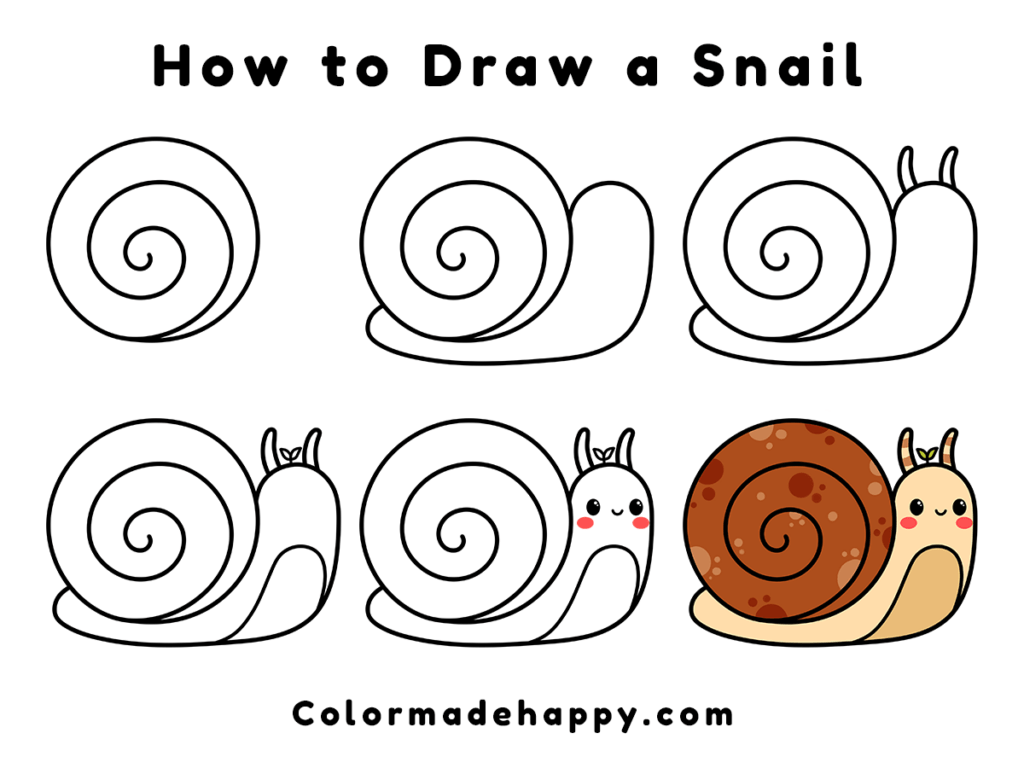
Now that you’ve gathered your supplies it’s time to create your very own snail drawing. Are you ready? Even though the drawing is simple, don’t rush through these steps. Just like a snail, slow and steady is the way to go.
Whether you want to draw a cute snail, a goofy snail, a cartoon snail, or a basic snail, these simple steps will get you the outline that you need. All you have to do is be willing to try.
Step 1: Draw the Snail’s Shell
The first step is to create the snail shell for your soon-to-be drawing masterpiece. You will start by drawing a small circle. You can make this larger or smaller depending on the size of the paper you are using.
If you can’t recreate the spiral drawing freehand, start with a circle. You could use a circle stencil or find something round (like a drinking glass) to trace. Of course, it’s ok if your snail shell isn’t a perfect circle too!
Once you have completed your circle, start on the inside, at the bottom center, and create a spiral shape to give your snail its distinctive shell appearance. You will end up with a curve line in the center of your spiral.

Step 2: Add the Body
Now that your snail has a home it’s time to give it a body. Start about ¾ of the way up the right side of the shell and draw an arch as wide as you want the snail’s body to be.
After that, take your pencil down with a slight curve and wrap it all the way around the bottom of the snail and curve it back around towards the bottom on the left side of your snail. Finally, move left under the shell and bring it up to connect.
Now your snail has a body it can slither on.

Step 3: Add the Tentacles
While snails don’t technically have ears, they have upper tentacles on the top of their head that help them to understand the world around them.
For this step, you are going to draw two small shapes that almost look like two small horns right on the top of your snail’s head. Leave enough space in between them for another detail that will be added in the next phase.

Step 4: Head and Body Details
Next, we are going to place a little sprout-like shape right in between the upper tentacles on the head of the snail. You will draw a short, straight line and then add what looks like a small leaf on each side.
This cute detail is a chance for you to be creative. Feel free to replace the leaf with something else, like a flower.
In this step, we are also going to create the snail’s belly. To do this, you will create an arch in the center of the snail’s body on the right side of the shell.
Take your lines down on each side of your arch, making sure to leave room on either side so that it defines the belly of the snail. Your lines will go all the way down to the outline.

Step 5: Draw the Face
Now it’s time to give your snail a cute face. To do the kawaii style eyes, first draw slight ovals on either side of its face. Then draw tiny circles where you want the whites of the eyes to go. Shade in the rest of the eyes leaving your small circle white.
You can also add a happy face (or angry for a grumpy snail!) and some ovals under the eyes to make your snail blush. If you are wanting more masculine features for your snail, you can leave this step off, but it definitely ups the cuteness factor!

Step 6: Add Color and Details
Finally, it’s time for the really fun part!
The final details of your snail are where you, and any little artists that might be drawing along, can really have so much fun! This is where you add color and texture detail to the rest of the body of your snail.
I like to color the body with two tones to give it more definition. Don’t be afraid to get creative with the shell – anything goes here.
Before you start coloring it’s a good idea to go over your drawing with a black pen or maker and erase the pencil lines.

Other Snail Drawing Ideas
Once you’ve mastered the basic snail you can start to get creative with your doodles. The easiest way to customize this drawing is to change the shape of the shell. After all, look how many different snail shells there are in nature.
Besides the size and shape, you could also change the design of the shell. Instead of a spiral, how about stripes or spots?
Finally, you could also position the snail’s body differently or change its shape and size. And don’t forget to give your snails different expressions!
What to Do With Your Completed Snail Drawing
Now that you have your beautiful, unique, and creative snail drawing, what can you do with it?
- You can use it as a reference image in a classroom or playroom to help others learn how to draw a snail.
- Stop at the outline phase of the drawing and create a page for a coloring book for students or children to fill up the time between activities.
- You can keep a portfolio along your drawing journey to show yourself where you started and see how far you go as you continue to try new crafts and art activities.
- Doodle it anywhere for a cute pick-me-up in your notebooks!
Other Drawing Ideas
If you are looking for more drawing inspiration, we encourage you to check out some of our other great resources! We love watching people explore their creative sides and learn to have fun with drawing and art!

